
This 5 Step Guide will review where the support should be, how to select the right bar, and confirm that it will work for the whole family.
When it comes to bathroom safety, one-size-fits-all doesn't work. Every client has unique mobility needs, preferences, and home layouts. As a DME provider or installer, it’s essential to guide clients through customizing grab bar placement to meet their specific requirements—balancing aesthetics, comfort, and safety.
Unlike commercial settings, residential installations don’t need to follow ADA guidelines. That opens up an opportunity to personalize support solutions while still delivering long-term safety. Many of HealthCraft’s grab bars, including stylish options from the Plus Series and Invisia Collection, combine form with function—making it easier to address both the practical and emotional barriers your clients may face.
Why This Matters for Your Clients
Falls remain a leading cause of injury among older adults, with most occurring at home. By offering solutions that help clients stand, balance, and move safely, DME businesses can enable aging in place and support long-term independence.
This article focuses on grab bar installation at the toilet. (Support at the tub or shower will be covered separately.) Some fixtures, like a clamp-on tub rail, may even serve dual purposes—assisting both toilet use and bath access.
For basic fall prevention at the toilet, we recommend at minimum one (1) grab bar fixture. For advanced fall prevention at the toilet, we recommend at least two (2) grab bar fixtures to provide additional balance and support.
What should a grab bar do for your clients at the toilet? It should provide support while they:
- Stand up and sit down onto the toilet safely.
- Lean to make wiping easier.
- Manage clothing before and after using the toilet.
Here's how we recommend approaching grab bar selection and placement in 5 steps.
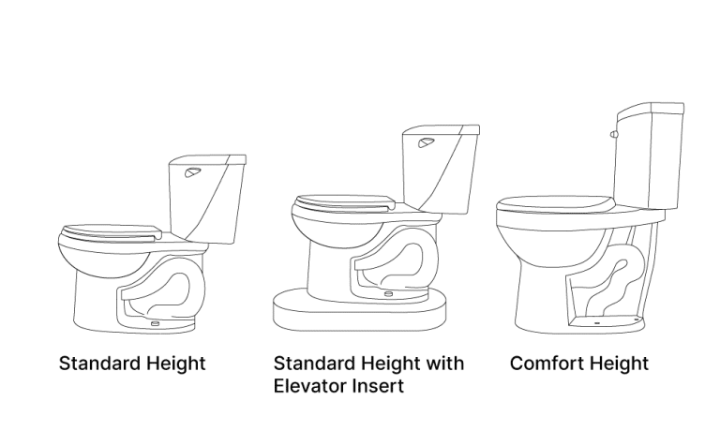
Step 1: Evaluate the Toilet Height
- Determine if the toilet needs to be higher to make it easier for your client. Have them sit on the toilet (lid open) and practice standing up and sitting down slowly and carefully.
- Consider a raised toilet seat, a toilet elevator insert, or a new taller toilet to give them an ergonomic advantage and make it easier to get up and down.
Step 2: Identify Support Needs
- Does your client need one-handed or two-handed support? Observe whether they struggle with balance or favor one side.
- Consider the amount of effort it takes for your client to stand up and to maintain control and balance during movements on and off the toilet, wiping, and managing clothing. Are their your legs strong and can bear weight equally?
- If their balance is poor, one side is weak, or both sides are weak, it would be best with two-handed support. The best support is achieved when the two hands are separated by 12” or more. Think of it as your stable base of support. Two hands on one side are NOT a stable base of support.
- If there is a wall on either side of the toilet, 2 wall-mounted grab bars could work.
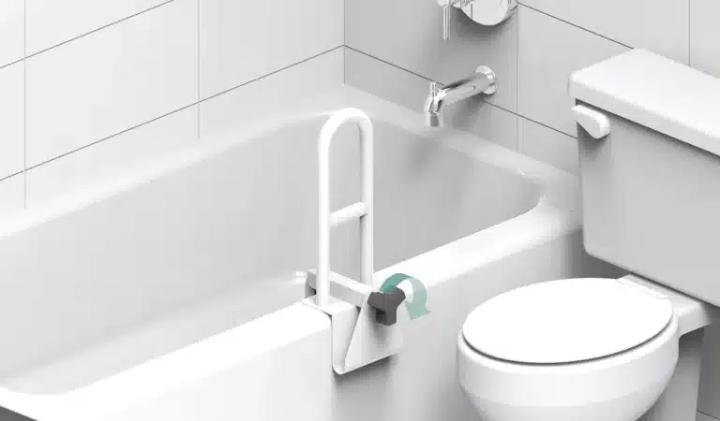
- If there is a tub on one side, consider a clamp-on tub grab bar on one side.
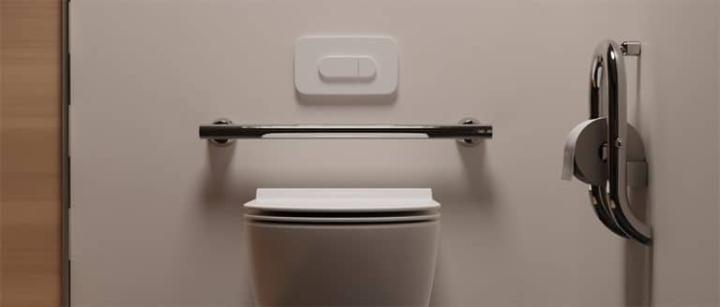
- If there is nothing for support, a floor-to-ceiling safety pole with a horizontal bar could provide the exact position and support needed for both hands OR consider rear wall-mounted fold down grab bars.

Step 3: Assess Natural Grip and Reach
- Have your client simulate standing using a broom handle. This helps determine their ideal hand and arm positions.
- Do they prefer to push up or pull forward?
- Do they require forearm support?
- Do they need the grab bar to assist in multiple positions (sitting, standing, more)?
- Do they need one or two-handed support?
- Using a broom handle can help your client simulate a grab bar to answer the following questions:
- What position feels most natural: vertical, horizontal, or on a diagonal (lowest end at your elbow and highest end further away)?
- In what position do you have the strongest grasp or best leverage?
- Also consider:
- Do they need to balance lightly on the grab bar or hoist themselves up with a lot of effort?
- Do they have a side that is stronger than the other?
Step 4: Choose the Position for the Grab Bar(s)
To ensure grab bars are positioned for maximum support and comfort, walk your client through the following assessment steps:
- Simulate Natural Movement: have your client sit on the toilet and slowly practice standing up. As they lean forward, ask them to reach out naturally—where would their hand instinctively go for support? Make sure their shoulders remain relaxed during this movement.
- Mark Their Reach: use painter’s tape to mark the spot on the wall or floor where their hand naturally lands. This provides a starting point for identifying the most effective grab bar location.
- Assess for Stability: next, have the client lean forward again—this time until their nose is over their toes. This position ensures their weight is centered over their feet. Identify where a grab bar would be most helpful to support that movement.
- Simulate Grab Bar Positioning: mark additional points with tape where support might be needed. Have a broomstick or similar object held in place to simulate a grab bar, and have the client perform several stand-and-sit trials using it. Adjust the tape as needed.
- Observe Over Time: if the client is unsure, leave the tape in place for a few days. Encourage them to continue using the space normally and pay attention to whether the marked locations feel comfortable and supportive.
- Confirm Household Fit: make sure the chosen grab bar position works for all members of the household who would benefit from using it.
Placement Guidelines for Specific Grab Bar Types
- Wall-Mounted Grab Bars: if the client prefers to pull to stand, a vertical or diagonal bar should be positioned in front of the knees (while seated), and no higher than shoulder height. Diagonal bars are especially useful for accommodating users of varying heights. If they prefer to push up, a horizontal bar beside the toilet is often best.
- Fold-Down Grab Bars: confirm the right height and ensure the bar extends far enough forward to help the user shift their weight and rise. Measure from the rear wall to the point where support is needed.
- Clamp-On Tub Grab Bars: when the toilet is adjacent to the tub, install the device slightly forward of the knees if possible. These often feature two height levels for added flexibility.
- Floor-to-Ceiling Safety Poles: place the pole vertically with the horizontal bar far enough in front of the client’s seated position to allow a smooth forward rise. Ideally, the client can use both hands on the horizontal bar, or one hand on the bar and the other on the pole, creating a stable base of support. The bar should be able to rotate once they’re standing.
Step 5: Secure Installation for Long-Term Safety
To ensure optimal safety and durability, it’s important to guide your client through proper installation practices—or manage the install directly when offering full-service solutions.
Mounting Best Practices
For maximum weight capacity and reliability, install grab bars directly into wall studs. This is the most secure method and ideal for clients who require strong, stable support.
If stud placement doesn’t align with your client’s ideal grab bar location, wall anchors (like the HealthCraft Hollow Wall Anchor) offer flexibility. These can be safely used on a range of surfaces—including drywall, tile, and fiberglass—when paired with compatible grab bars.
Product Compatibility Matters
HealthCraft offers several grab bar options that work seamlessly with wall anchor systems. The EasyMount Grab Bars come in six lengths (12”, 18”, 24”, 32”, 36”, and 42”), making it easy to match the product to your client’s needs and bathroom layout.
For clients who want to blend safety with convenience and aesthetics, the Plus Series is an excellent option. These 2-in-1 bathroom accessories combine grab bars with functional elements like a toilet paper holder—offering both style and support in one solution.
Planning During Renovations
If your client is undergoing a renovation, suggest installing wood blocking behind walls. This allows for complete freedom in grab bar placement and ensures secure, code-compliant installation regardless of surface constraints.
And there you have it … In 5 easy steps you have made toileting safer for you and your family. If you are worried about yourself or a loved one falling in the home, then take our fall risk assessment and get the insight you need to make your living space safer.

About the Author:
Sandy Alexander B.Sc.(O.T.) is our Community and Clinical Education Specialist at HealthCraft Products. She comes to us after a rewarding 36 years as an Occupational Therapist. Sandy's passion for enabling function, adapting environments, and improving the quality of life for others, drives our mission at HealthCraft. She is spreading the message of Fall Prevention through local community events, industry conferences, and throughout our North American dealer network.